free to be able to rate and comment on reports (as well as access 1:25000 mapping).
Last summer we returned to Glen Callater to re-investigate the
Canberra on Càrn an t-Sagairt Mòr. We were aware of a second plane crash site in this area, that of a RN Fairey Swordfish, but there was so much of the Canberra to find and photograph that we didn't have time to search for the second wreck. Now it was time to look for the lost Swordsman of Tolmount.
The site in question is located at the very top of Glen Callater in a steep corrie (not named on OS maps) only 250m below the summit of Tolmount so naturally, we would visit the wreck and then continue to the top of the Munro; whether we would add any extra summits would depend on the weather and how we felt about it (we had already climbed all M's in this area so there was no pressure to multi-bag). In the end, we included Càrn an Tuirc, making our walk a two-Munros-a-day adventure

Conditions were all right, a bit grey and windy on the high plateau, but the hills were busy with walkers (though no one was daft enough to climb up the steep side of the wet corrie instead of taking the easy Jock's Road):
The Callater car park was already busy when we arrived:
The initial walk-in is on a good track (can be cycled). We discussed a possible traverse of Sron nan Gabhar in winter conditions (we had climbed it as part of a bagging-spree day but didn't have time to explore it properly).
![2021-08-14 tolmount 003.JPG]()
- Always happy to return to Callater!
The day was partly cloudy but the cloud was well above the summits. We reached Loch Callater and took a short break by the shore:
The WH description suggests that the right of way alongside (and past) the loch is very boggy, but we were pleasantly surprised. Yes, we encountered a few short, wet sections, but 90% of the walk-in was a pleasant stroll on a good, dry path. The deeper we marched into the glen, the more mysterious (and beautiful) it looked!
The cliffs of Corrie Loch Cander:
On the Jock's Road in the upper glen:
The path eventually ascends the eastern side (left as you face the top of the glen) and all other parties going up Tolmount followed this route; they gave us odd looks when we left the path and started hopping over peat-haggy bottom of the corrie, staying on the eastern side of a small river. We knew the crash site was on a steep slope below the cliffs to the right (west) and from below, the rim of the corrie seemed...well...challenging to say the least.
![2021-08-14 tolmount 028.JPG]()
- Following the Allt an Loch
It had rained the previous day so all streams were full but thankfully, not wide enough to stop us!
![2021-08-14 tolmount 192.JPG]()
- The swordfish crash site is right above Kevin's head in this photo, to the left of the waterfall
We crossed the stream above this rocky mini-gorge:
 2021-08-14 tolmount 037
 by
Kevin Dalziel, on Flickr
Looking up the cliffs and to the crash site from the bottom of the waterfall:
 2021-08-14 tolmount 038
 by
Kevin Dalziel, on Flickr
Just as we hopped over the stream, I spotted a couple of metal pieces lying on the grass; they must have tumbled down from the crash site, or maybe they were carried down:
Close-ups:
 2021-08-14 tolmount 042
 by
Kevin Dalziel, on Flickr
 2021-08-14 tolmount 046
 by
Kevin Dalziel, on Flickr
A few meters above the first discoveries, I found a squashed fuel tank:
 2021-08-14 tolmount 049
 by
Kevin Dalziel, on Flickr
Zoomed:
At this moment, as I looked up, I recognized more metal parts gathered in a pile higher up the slope, so I just charged up to reach them quickly:
Kevin, in the meantime, wandered around the bottom of the slope in search for more debris. He located a mangled cowling ring from the engine:
Zoomed:
Above us, the waterfall was making a lot of noise; I wondered if it was possible to get closer to it, but as the slopes were wet and slippery, we didn't take the risk:
 2021-08-14 tolmount 054
 by
Kevin Dalziel, on Flickr
The main site of the crash is at the height of about 700m, in a shallow gully. If you decided to visit this place, please take care, especially on a wet day. The slopes are very steep at this point!
 2021-08-14 tolmount 236
 by
Kevin Dalziel, on Flickr
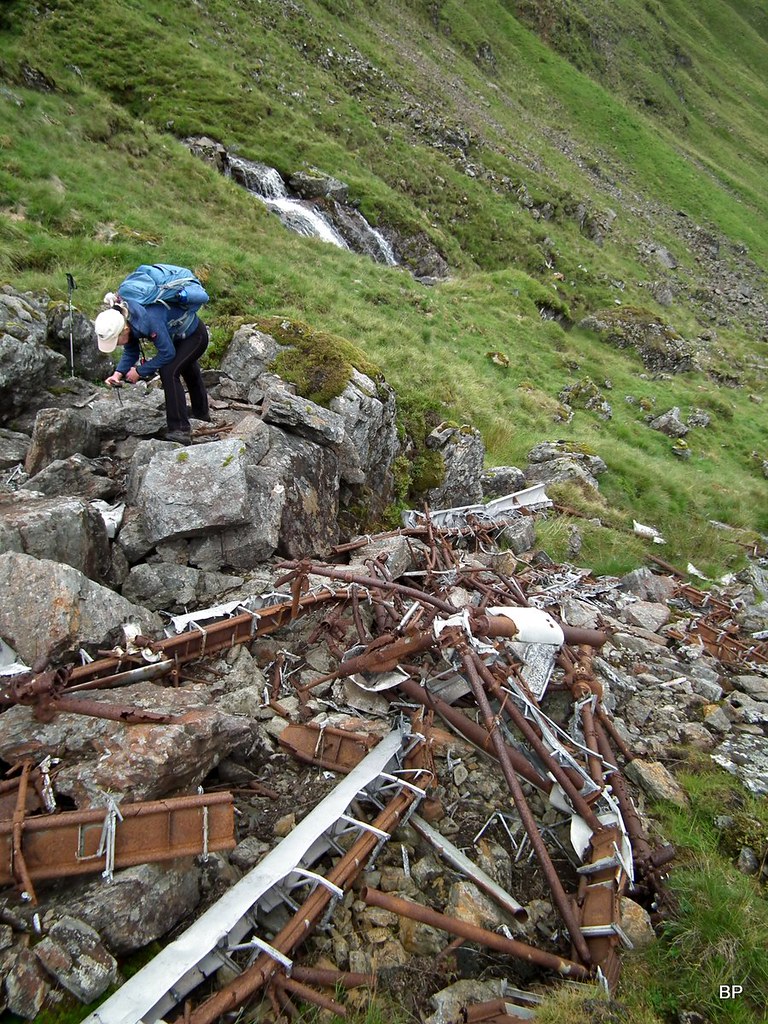
I was gobsmacked by the amount of wreckage still at the site. As Fairey Swordfish was a light structured bi-plane, covered in easily-degradable canvas, we didn't expect to find much, but there is still a fair amount of the aircraft main frame present, including the wing spars with the metal leading edges:
 2021-08-14 tolmount 243
 by
Kevin Dalziel, on Flickr
Possibly a part of another fuel tank:
More details of the frame structure:
2021-08-14 tolmount 243 by
Kevin Dalziel, on Flickr
Possibly an electric motor lying at the bottom of the wreckage pile:
The wreckage from above:
As per usual, I was drawn to the small pieces of debris scattered around. It wasn't easy to balance on the steep, rocky slope but I did my best:
 2021-08-14 tolmount 115
 by
Kevin Dalziel, on Flickr
The top end of the metal leading edge of the wing; the remaining part of the structure was covered in canvas which has sadly disappeared by now.
The identity of this plane has sadly been lost over time. According to "Aircraft Wrecks...":
"The identity of the Swordfish that crashed in Glen Callater has not been positively determined, it is thought that it might be Swordfish L9730 and that it came down in the glen during a flight from Arbroath in Angus."When browsing aviation forums, I found a note that some parts of this swordfish have been recovered by the Fleet Air Arm museum.
One last look at the crash site:
To reach the summit of Tolmount from the wreckage location, we climbed the slope above, steep bust mostly grassy:
Kevin considering the direttissima

...or maybe not!
This grassy ridge looks much more friendly!
Panoramic view of upper Glen Callater from above the crash site:
We climbed out of the corrie and joined the long line of people walking towards the summit of Tolmount; we had to wait a few minutes for a quiet moment to take a summit snap.
![2021-08-14 tolmount 153.JPG]()
- Lucy on her 140th Munro!
Looking east from the summit of Tolmount:
Upper Glen Doll:
It is possible to add Tom Buidhe but we didn't really fancy walking in the long cue, so decided to take a shortcut across to Cairn an Tuirc. Weather wasn't brilliant, a rather grey experience, but we didn't mind returning over the second Munro instead of retracing steps into Glen Callater.
Looking back to Tolmount from the slopes of Cairn an Tuirc:
A runaway hare
![2021-08-14 tolmount 164.JPG]()
- Catch me if you can!
Lochnagar &co. from the summit of Cairn an Tuirc:
Only now we realized that wee Lucy has just bagged her 141st Munro, making her probably the first ever fluffy mountain lamb to reach the half-way point on Munros!
 2021-08-14 tolmount 178
 by
Kevin Dalziel, on Flickr
Lucy trying to hijack the trip report (Write about me! me! Meeee!)

 2021-08-14 tolmount 337
 by
Kevin Dalziel, on Flickr
After a short rest on the summit of Cairn an Tuirc we took the estate track heading back down to Glen Callater. We detoured to the edge of Corrie Loch Kander for a panoramic snap:
 2021-08-14 tolmount 184
 by
Kevin Dalziel, on Flickr
The track descends to Glen Callater near Lochcallater Lodge:
 2021-08-14 tolmount 191
 by
Kevin Dalziel, on Flickr
We didn't hurry on the way back, enjoying the return walk at a lazy pace. Two good M's and a crash site, not to mention a half-way point for a lamb, that's a day well spent!
More stories about lost planes and misbehaving mountain lambs to come soon!
Sources for the Fairey Swordfish crash site:
http://www.edwardboyle.com/wreck19.htmlhttp://www.wtdwhd.co.uk/glencallater.htmlhttps://www.thecourier.co.uk/fp/lifestyle/2510360/wreck-hunters-traces-of-war/https://www.key.aero/forum/historic-aviation/89278-swordfish-wreck-glen-callaterAircraft Wrecks: The Walker's Guide: Historic Crash Sites on the Moors and Mountains of the British Isles. (2009)
by Nick Wotherspoon, Alan Clark and Mark Sheldon
