
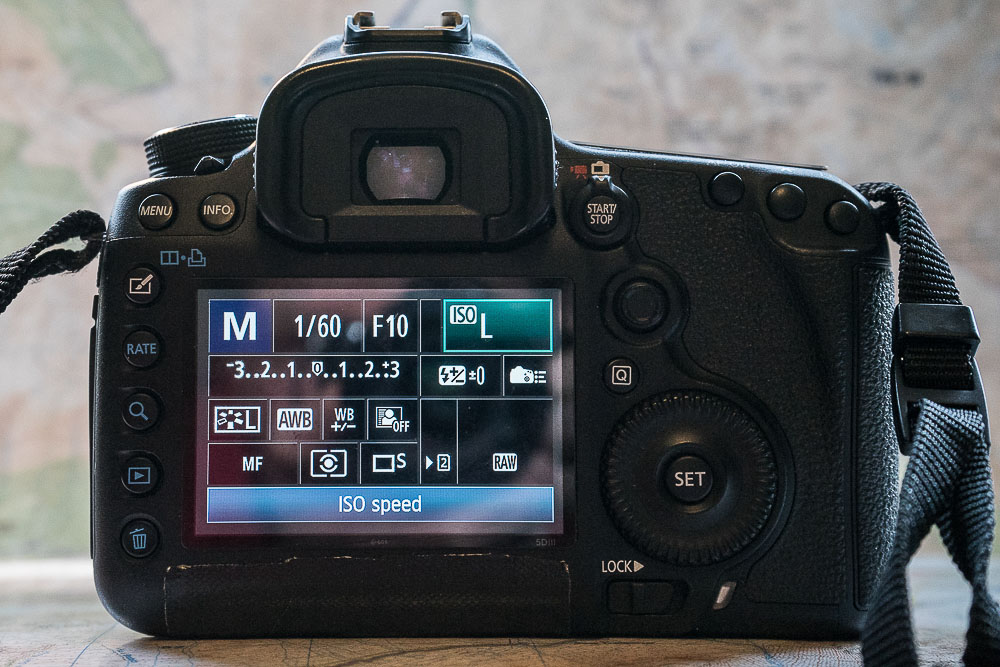
 I’m pretty wary of straight ahead technical articles for Walkhighlands, but after chatting to friends on and off the hill, it’s apparent that lots of folk have incredibly powerful, modern cameras but don’t always know their way around the controls. The tech-talk is a bit dry on its own and covered elsewhere on the web, but decisions on which dial to reach for and when are definitely worth a look in an outdoors context. First though, set your camera to M for manual.
ISO4000, f8, 50th second
Let’s look at the holy trinity: Shutter Speed, Aperture and ISO – the 3 cardinal points of a triangle that can’t be avoided if we’re to understand more than point and press. All 3 control the amount of light that hits the sensor in a digital camera to create the ‘exposure’. They do that in very different ways, but if one setting is adjusted, you’ll need to tweak one or both the others to compensate. One of the joys of photography is the controls are fairly simple, but the outcomes are complex: The holy trinity interact with each other to produce a huge variety of results. Before we get to the interaction, let’s briefly cover the 3 controllers, in no particular order:
ISO stands for ‘International Standard of Organisation’ – and actually the ISO organise standards for all sorts of things – but for camera users, this refers to our chosen sensitivity to light. In ye olden days before drones and binary code, a ‘slow’ film required more light than a ‘fast’ one. Once you set your camera to accommodate that roll of film, that was it for that roll. Conveniently for digital users, we can change the camera’s sensitivity to light from shot to shot, with the touch of a dial or button. As a general rule, a higher ISO number means more light hitting the sensor, which is useful in low light conditions, but there’s a payoff – more noise or ‘grain’ in the image. Some cameras are cleaner ISO performers than others, but for all makes and models… like a guitar amp, if you turn up the ‘gain’, eventually you get distortion.
Shutter Speed This setting determines how long we expose the sensor to the light input. With a long shutter speed, things that move more quickly will appear blurred.
Aperture (aka F number) This is a measure of much light enters the camera through the lens aperture. A low number equals a big hole in the lens, equals more light hitting the sensor. A higher number equals a smaller hole, equals less light. But there’s another factor at work. The F-number also controls the focal plane, (aka ‘depth of field’). As a general rule, the higher the F number the sharper the focus throughout the depth of the image, from near to far. The lower the F-number, the bigger the lens aperture, and the more specific the focal plane. That means that only a part of the image will be in focus. I don’t want to dwell on focal plane too much this time, because it warrants it’s own focus (ahem), but it’s included in passing because our choices about what we focus on dictate our aperture, which in turn impacts on the other 2 settings.
Let’s put these into context with some examples:
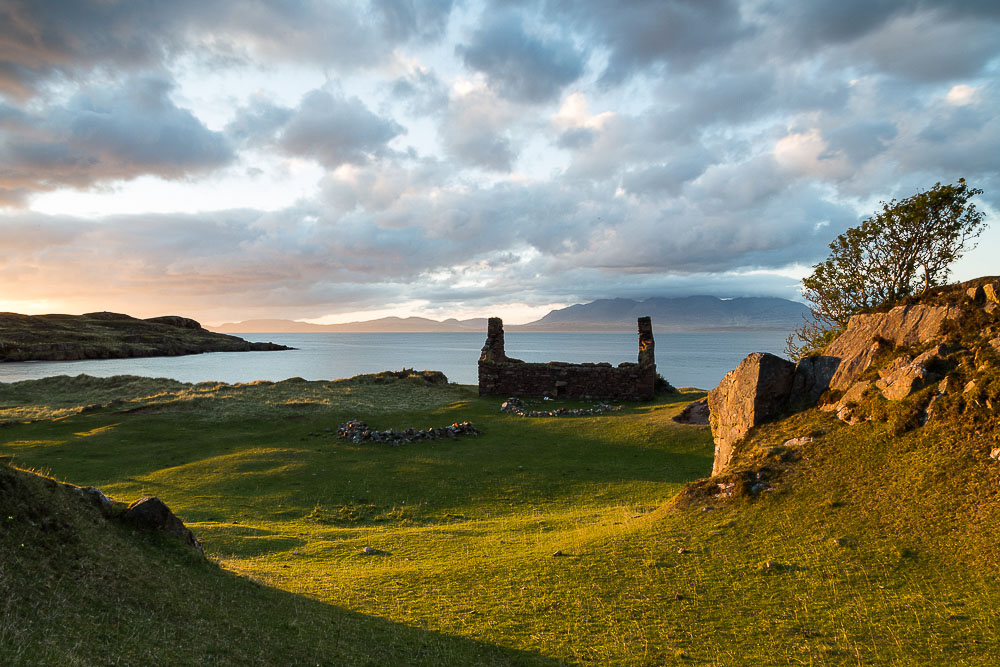
ISO 50, f22, 1.6 seconds
This photo was taken from Rum looking over to Skye, on a spring evening. There was still a fair amount of light swilling around, but it wasn’t full daylight, as you can see by the long shadows. It’s a conventional landscape image and I wanted it sharp from near to far, so I set a low ISO to keep ‘noise’ to a minimum, and used an exceptionally high aperture of f22. This is pushing my luck (for all sorts of reasons I’ll go into another time), but here it’s resulted an image where the hills in the background are almost as sharp as the blades of grass in the foreground.
Back to our relationship triangle for a second: Adjust one of the holy trinity, and the others have to compensate. A low ISO and high aperture would surely mean an underexposed image… except I had a tripod to keep the camera steady for a longer shutter speed. Extending the time has the added advantage of saturating colours a little, which worked OK in this instance.
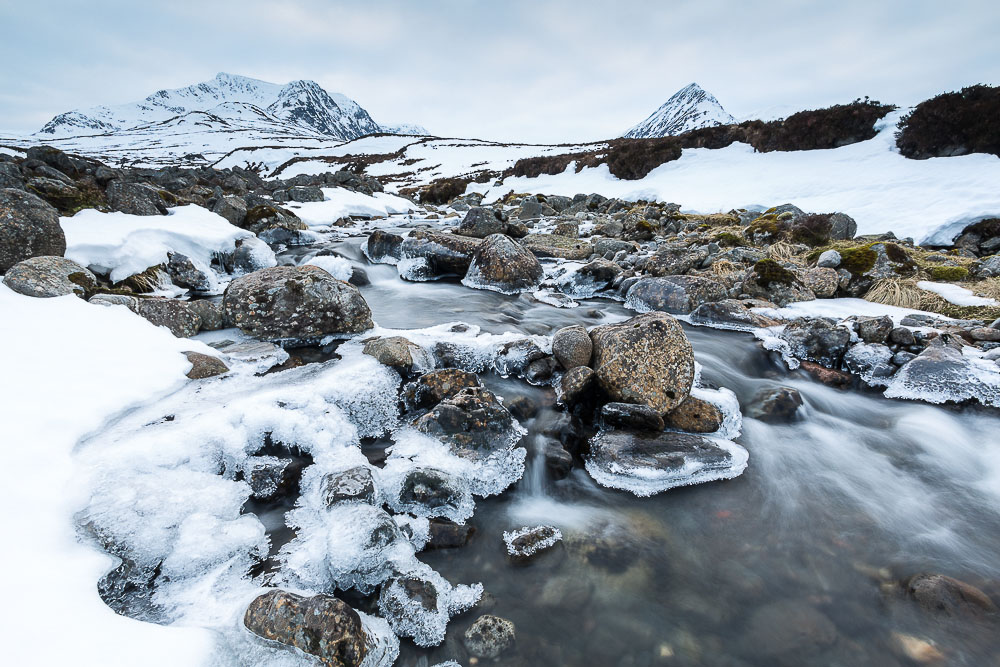
ISO50, f22, 1.3 seconds
Briefly staying with similar settings for the next one of Ben Alder and Sgor Lutharn, to show what happens in a more dynamic scene when time is extended. Another straightforward landscape shot, but with a bit more happening in the foreground. In this case the longer shutter speed means the movement of the water is captured over time as slightly blurred. The longer the shutter speed, the more mist-like the flowing water. It’s worth paying special attention to shutter speed whenever you have moving objects in your frame – people moving, trees in the wind. Sometimes you want to show movement (slower shutter), and sometimes you want to ‘freeze’ it (faster).

ISO 1600, f2.8, 60th second
Next up is Cruach Ardrain, with Stob Binean and Ben More on the right. Another landscape, but with no real foreground interest. It’s the very last light of the day – dark, extremely cold, and is hand held. As with all photography, especially outdoors, those conditions have implications. A shot taken in near dark necessitates a slower shutter speed, but not too slow… because my hands were shaking! So, I’d better turn up the ‘gain’ or ISO to compensate a. for the lack of light and b. a shutter speed that I can’t reduce any more for risk of camera shake. Not too much though, because I know from previous experience my camera doesn’t like noise in the dark areas of the picture. This means I need to have my aperture pretty much wide open (a low f-number, a big ‘hole’), to let enough light into the camera to get a half decent exposure. The result isn’t a ‘keeper’ for me – it is technically in focus but sharpness isn’t great, primarily because the higher ISO means a very noisy picture, with lots of digital grain burying the detail. I’m still glad I took a personal photo though – it was an amazing place to be.
ISO50, f4, 1000th sec
This next one isn’t perfect either, but I’m staying with a lower aperture to demonstrate the effect this has on focal plane once you get up close to something. It’s of Lustentyre beach on Harris, jaw drop beautiful and a justifiably highly photographed place. I was looking around for different angles. Here I wanted to focus attention on the texture and lines in the sand, so I chose a lower f-number to lead the eye to the foreground and blur the hills in the background. Because it was daytime, I was able to use a low ISO for less digital ‘noise’, plus a fast shutter speed, which was useful for 2 reasons: 1. Because I was crouched in an uncomfortable position and was wobbling around in the wind and 2. That wind meant a lot of sand was blowing around, so I wanted to ‘freeze’ the scene and not get any movement recorded into the image.

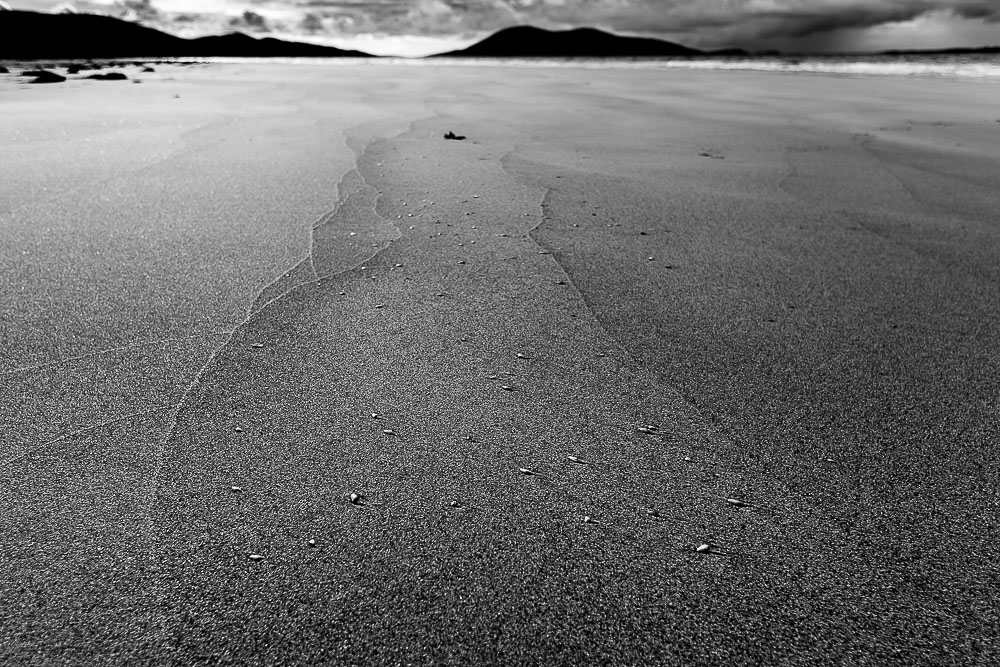
ISO200, f13, 160th second
Let’s finish with another black and white, and technically a more successful shot. We’re back looking at the whole scene, not just the foreground –the interplay of minimal elements in the landscape at Aberlady Bay, one of my favourite haunts when I lived on the east coast. I needed a higher f-number to ensure that both rock and rainbow were in focus, and that decision dictated the rest. It’s a daylight scene, and a small increase in ISO in reasonable lighting doesn’t introduce too much noise. The shutter speed came last, just to balance the exposure. If you compare the water in this photo to the water in the second example you can see there is more detail ‘locked’ into the image, and less blur – that’s because of the faster shutter speed.
Some decisions are creative, some are technical. The aim is to balance the latter in service of the former. To recap – If one camera control is adjusted, the others should be adjusted to compensate. Outdoor conditions may impact on your choices. Choice of aperture also affects the focal plane, or depth of field. I’ll return to this last one in the future.
Want to improve your landscape and nature photography? Check out our listings for Scottish landscape, wildlife and nature photography workshops, hides and holidays.